Wednesday, March 27, 2013

A beautiful place in Virginia...

Once again I've been looking for things to blog about other than my crafts.  I love taking pictures and it's something that one day, given enough time, I'd like to learn more about.  Maybe after all of these Nursing classes I'll be able to enroll in some photography classes.

The pictures that I want to share today are of a post-Civil War era cabin in Virginia that my great-grandmother lived in.  I'm going to post the pics ten at a time in order to not overload the blog uploader :)

You can click the photos to make them bigger.  I uploaded them as "extra-large", which looks good here, but I'm sure if I ever change my blog template I'll end up regretting it as extra-large photos always seems to run over the edges.  Anyway, I hope you enjoy them!
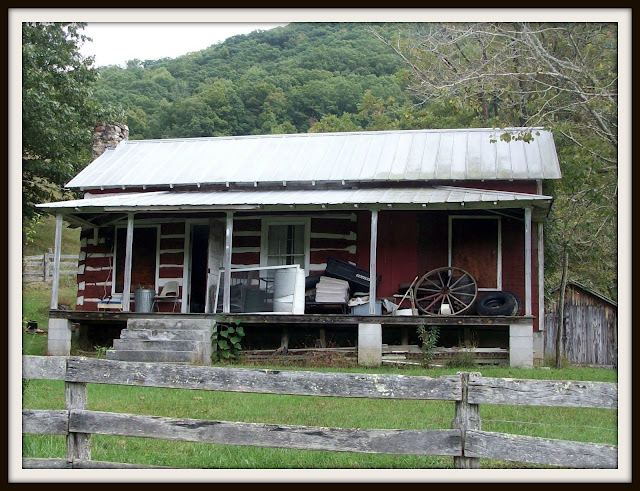

The original cabin can be seen on the left side.  Other sections were added on some time later.


The cabin is nestled among these enormous hills.


No one has lived in the cabin for a long time.  It's now used by the current owners for storage.


An old wooden gate at the back of the property.


One of the wells on the land, with a hand pump.


The side of the cabin showing the chimney.


One of the numerous outbuildings.


A back view of the cabin.


I just loved the color of this rusted gate.  I did have to edit these a bit to get the colors to match what I actually saw the day I took the photos.


I loved the look of the mold on these old fence posts.


This is probably my favorite picture from that day.  The colors of this outbuilding and the surrounding greenery were just so beautiful!

Monday, March 25, 2013

Halloween Cookies using Hole Punches from Walmart


You may remember these hole punches that I bought a while back.  I found them for $1 each in the craft aisle at Walmart.  I have been wanting to make some polymer clay cookies for a long time now so I finally got around to trying these out.


The polymer clay colors that I used were a dark chocolate brown, reddish-orange, and an off-white.  I worked tiny bits of clay together into a ball until I had the right cookie color that I wanted.


I found a tutorial video where the clay was rolled out to almost paper thin.  You can either use a hair dryer, microwave, or a regular oven to make the clay hard.  There are usually instructions included with the clay.  Here are some tips from Sculpey's website http://www.sculpey.com/faq-new/198


 Punching the cookies out is not as easy as you would think.  If you've made the pieces too thick then you can't cut through them and if they are too thin then the cookies will break into tiny pieces.  It took quite a few tries to get this many cut out.


The trick that I found was to use Translucent Liquid Sculpey in order to make icing for the cookies.  Most of the tutorials that I found said to use oil based paints to make the colors, but to be honest I didn't have much luck with them.  I used the regular acrylic paints that I already had an had a better result.  I couldn't find a brush small enough to paint with so I thought a toothpick would work.  Only I couldn't find any so I ended up using these paper umbrella toothpicks that are for cocktails, lol!


 Here are my resulting cookies on some tiny tea plates with a quarter to show the scale.  I didn't think they were too bad for a first try.


I thought I would leave you with a nice layout pic.  The doilies are cut from those cute little tissue paper ones that come out around Valentine's day and the pumpkins are of course putka pods.  I'm hoping that Walmart will have a tiny gingerbread shaped hole punch around the holidays because I'd like to try making a skeleton cookie.  I think I could do black icing and then use a toothpick to put tiny white bones for the rib cage, arms, and legs, etc.

Happy Monday everyone!

Friday, March 22, 2013

DIY Upholstered Mini Chairs and a blog recommendation

I want to give a blog recommendation today to one of the best mini blogs that I have found in a really long time.


Kris has some of the best tutorials that I have ever found.  Let me explain a little bit by saying that when it comes to tutorials I need alot of help.  I need detailed instructions and lots of pictures.  This blog does exactly that.  So far I've tried three of her tutorials and each one has turned out fabulous!  She has so many diy's - you can build something for each and every mini room that you could possibly think of.

The first tutorial that I tried was for an upholstered mini chair.  I won't even try to repeat her tutorial because I don't know of any possible way to improve upon it.  This is really a fabulous tutorial.


She includes patterns that you can print out to use as you build your chair.  The easiest way that I found to do this was to open the pictures in a Microsoft Word document.  She includes one inch squares beside each of her pictures that help you to get the scale right.  In Word I first made sure the ruler was showing on my screen.  I then right-clicked on each of the images, made sure "lock aspect ratio" was clicked and then changed the size until the scale square matched up to one inch on the ruler.  My patterns printed out perfectly and I used a ruler to verify the measurements.


Kris uses cardstock, matboard, and 3/16" foamcore to build her chairs.  All very inexpensive materials.  I was able to buy the foamcore at Walmart.  I did have to go to Michael's for the matboard though so I used a 40% off coupon. She also uses this stuff called Thermaloam to pad her chairs.  I couldn't find any of this stuff at Michael's so I substituted layers of white felt to pad my chair.  She also has this incredible way to pipe her chairs that I really wanted to try out, but I ran out of fabric before I got to that step.  I painted crochet thread and used that to pipe instead.  The one thing I would change is that I would use thicker crochet thread next time as mine didn't quite look as nice as hers.


Tada!  And here's my chair!  I adore this fabric - I think it makes such a comfy looking chair.  You can see in this pic that my piping isn't quite as noticeable as I'd like it to be.  I'll probably go back over with new piping once I've bought some thicker thread.

Happy Friday everyone!


Wednesday, March 20, 2013

Lisa's Country Cottage Kit Part I


This kit came up a while ago on an absolutely huge sale.  It was the kit for last year's creative contest or building along or something or another.  David was sweet enough to buy it for me and after like a 75% off discount I think it was $29.99.  It may have even had free shipping if I remember correctly.  I adore tiny houses like these real life ones at http://www.tumbleweedhouses.com/ and this cottage reminded me of them.


The base was four long pieces with this larger platform piece on the top.  I'm trying my best to put this one together with no goof-ups so I started out with my level.


I took cardstock and made patterns of all of the inside walls.


I figured I could use these later to make it easier to add wallpaper to the inside rooms.


Above is a dry fit of the outside of the house minus doors, windows, and the porch posts.


And a dry fit showing the inside.  They really didn't leave alot of room for the ladder to get up into the loft space, did they?


Remember me saying that I wanted to avoid "goof-ups?"  I hate to even include this picture, but you'll see this mess in a few posts anyway.  The only thing that I thought the cottage was missing was a bathroom.  I thought I could cut a door in one of the side walls and then wall in a small section of the porch to use for a bathroom.  Great idea huh?  Not quite...

Happy Wednesday everyone!

Monday, March 18, 2013

I GOT IN TO NURSING SCHOOL!!!


If you're friends with me on Facebook then you've probably already seen me posting about this for about a week now.  After an excruciating wait since March 1st (when all of the letters were supposed to be mailed), I finally got my letter of acceptance last Monday.  I am absolutely thrilled to pieces!  I got in to Nursing school!!!

I worked all last year to finish up the prerequisite classes that I needed in order to apply.  My first bachelor's degree didn't require all of the sciences that I need so I took A&P I, A&P II, and Microbiology.  I also took a Psychology class, a computer class, and Medical Terminology.  My sister is an RN who is back in school getting her masters so she can be a Family Nurse Practitioner.  She is the one that convinced me that I should go back to school and helped me to succeed.  She is my inspiration!

I applied to more than one school, but my first choice was my Alma mater ETSU.  I took the entrance exam back in January and it's been one big long waiting game since then.  I applied to both the traditional and the accelerated program and was accepted into the accelerated one.  So I'll start classes at the end of May and God-willing I'll graduate in December 2014.

I have worked so hard this past year and I know that there is a ton of even more hard work ahead of me.  I have no idea if I'll be able to able to keep up with any of my hobbies, my crafts, my blog, or even my sanity for that matter!

Wish me luck!