Tuesday, July 21, 2009

I am in love with a dollhouse!

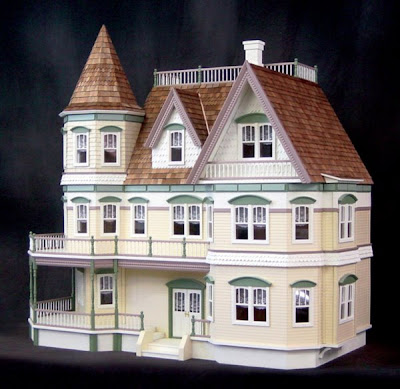
Absolutely positively in love! And you guys are probably the only people I know that will understand. A friend of mine brought the Summer 2009 HBS catalog into work because she knows I love minis and I found my dream dollhouse - The Queen Anne II. It is magnificent! I've been trying to think of every excuse possible to justify spending $859.00! Including getting married, getting pregnant, giving birth to a daughter who would of course require a dollhouse of her own in a few years (which would give me time to build it), but David just won't go for it. Oh well, I guess I can dream - and save ;)
The catalog says The Queen Anne II is made by Real Good Toys and the following pictures are owned by their website and not by me. Their site is amazing though so check it out if you haven't already http://www.realgoodtoys.com/. The dimensions are 50"W x 49" H x 24"D so that means I am only about 16 inches taller than this house would be when fully built. I guess I really need to wait until I have a "real" house of my own before investing in something like this because once built this dollhouse would be so big that I wouldn't fit through my apartment door so I wouldn't be able to take it with me!
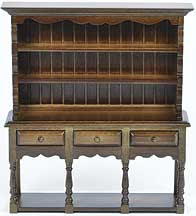
Then I saw this miniature English display hutch (once again the pic is owned by http://www.miniatures.com/hbs/global/index2.asp and not me) and that sparked the idea that this house would make a beautiful inn! Can't you just see little keys hanging for the rooms and little envelopes and parcels of mail sticking out of all of the little cubbys? I love it!
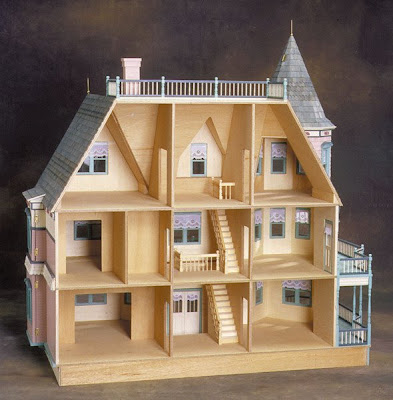
The inside shot of the house is what sparked my imagination the most. The catalog says this is a 13-room kit, but I only count 12 so I'm not sure exactly where the hidden room is. Any ideas?
So this is how I imagined it - you would come in the double doors and there would some sort of counter there and the display hutch would be behind it against the wall. The downstairs could be used as a little dining establishment that would be open to the town locals as well as the mini travelers who are staying the night at the inn. I think I would have to do a little bashing to the layout to make everything look the way it does in my head though. I think the downstairs room to the right should have a door leading out onto the beautiful porch so you could dine outside in the evenings. I'm not sure what all would be in the downstairs room to the left, but I know there would have to be a kitchen somewhere and maybe some sort of den area with some comfy chairs where guest could curl up with a pipe and a good book. The closed off rooms on the left-hand side of the second floor would be for the inn keeper and his family. The small room in the middle would be the shared bathroom for the inn guests. I would want one of those older toilets with the pull chain so I'm not sure what time period that would put the house in. The room to the right and the two rooms on the third floor would be bedrooms painted with warm colors and filled with big comfy beds with plenty of blankets and fluffy pillows. There would be wooden floors throughout and rich carpets and rugs scattered around. I wonder if there would be a way to take the outside door out of the second floor bedroom and put it in the hallway where the stairs are so that all the guests would have access to the balcony? And what exactly do you put on a balcony anyway? It seems like rocking chairs would go on the front porch, right?
I found this great gallery online of a finished Queen Anne that I wanted to share as well. For some reason if you click on any page other than the gallery it says the site is disabled so I really hope these pictures don't get taken down. http://jeaniesteenies.com/gallery/nw/The_Queen_Anne.html. The person who put this house together did an amazing job.
And by the way if anyone would like to donate to my dream I do have a paypal account...just kidding!!! Later guys!

Monday, July 20, 2009

Hello and welcome!

We have two new followers! Please welcome Kath who is from Alabama. She loves minis, children's media, Halloween, and lots of other great stuff! She has three blogs listed: http://halcyonminis.blogspot.com/ http://plaidpompom.blogspot.com/ http://eureekachu.blogspot.com/
And please also welcome Tarapiglet. I don't see a blog for her just yet, but her name is super cute! Kitty, Sophie, and Olive are all happy to meet you!

Saturday, July 18, 2009

31 followers and I finally finished up the introductions!

And that is probably the only good thing that I have been able to accomplish all week. I've been miserably sick and spent most of this week in bed (we're talking 12+ hours each and every day) but the few times that I could handle sitting up I did spend a bit of time online.

I would like to thank all 31 of my followers and I promise to never get behind on introductions again! Introductions like these on other sites are how I've found some fabulous blogs out there! And those of you who have blogs for things other than minis, such as poetry or family, have inspired me to share a bit more of myself as well. I'm thinking of starting another blog for some of my writing.

Anyway, now to introduce a few more followers:
First is Maija who is from Nousiainen, Finland. Even with the google translation gadget I couldn't read everything, but I saw some great mini pics, which is good enough for me! Check out her blog at http://iidasanttu.vuodatus.net/.

Second is Dora who is from Barcelona, Spain. She has many many blogs to check out! These range from minis to paintings and more!
Third is Kathi who is from Birmingham Alabama. Her blogs have beautiful music and are both enchanting and inspiring! Check out her blogs here:
And next is Caseymini and honestly she probably needs no introduction for the majority of you. Casey has been making minis since the 80s and is from Tucson Arizona. Casey's blog is more than amazing. There is so much that you can learn about minis and mini making from her blog. I finally just ended up starting at post #1 and started to read forward. Casey's tutorials will help you to learn how to make your own minis and I honestly think will end up saving you money as well. I highly recommend her blog http://caseymini.blogspot.com/.

And the newest follower is Maria. I didn't see any profile for her, but she does have a blog about investing. Even without a mini blog she is very welcome here!
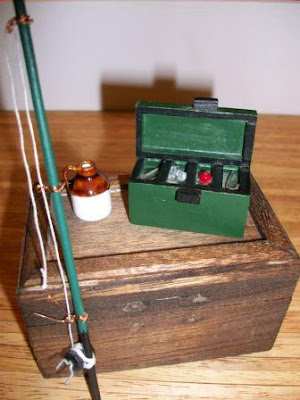
And to end this post I'll leave you with a new layout pic since I haven't posted any in a while. Both Kitty and Sophie have an interest in fishing so I see another outdoor adventure in the making :)

Wednesday, July 15, 2009

Hot fun in the summertime!

As you may remember from a few posts back Sophie has been begging me to take her swimming. At first I was against the idea, but after some creative thinking I was able to come up with a fun day that Sophie and Olive both seemed to enjoy. As you'll see from the pics below my parent's lawn is in need of a cut, but the girls didn't seem to mind. Sophie is actually swimming in a floating frog soap dish, but at her size it makes a perfect blow-up kiddie pool. And Olive is playing in the sandbox that I was working on in the last post.
In this pic you'll see Sophie encouraging Olive to come and join her in the pool.

But, as you can tell Olive is intent on building a sandcastle. She filled the tin watering can in the frog pool and carried it back to the sandbox careful not to spill a single drop. She also borrowed the red pail and shovel from my Mom's shadowbox. Olive is very convincing when she wants to be - she was able to talk my Mom into letting her keep the watering can since it was one of a pair. Unfortunately we - oops, I mean Olive wasn't able to talk my Mom into letting us keep the pail and shovel. I would like to maybe paint the sandbox red, purely for sentimental reasons though, as the one I had growing up was painted red.

But eventually a little sisterly convincing / pestering won out. The girls had great fun splashing around and playing a game of toss with the beach ball.

I'll leave you with one last overhead shot of the girls playing out in the backyard. I don't know how well you could tell from the pictures, but I hand sewed the tiny bikini bottoms. I took a small piece of fabric and folded it in half and then cut semi-circles out of the bottom edges. I then fitted the bottoms on the dolls and folded the tops over at the waist and sewed the sides together. I definitely need to search online for some free clothes patterns so that I can do a bit more practicing. Anyway, I hope everyone enjoys the pics!

Monday, July 13, 2009

30 followers and new progress pics!

I'm excited to say that there are 30 followers to my blog! I'm just mad at myself that I've still not caught up on reviewing everyone's blogs. So over the weekend I did some more reading and I've got to say that you guys have some really wonderful blogs out there - greats pics, great ideas, and some of you have great music as well - that's something that I'd like to maybe figure out how to add to my blog.

So here goes: The first follower that I checked out was Susan Ghearing - I don't see any blog for her as of yet, but I'm still very glad that she's here!

Next is Casita Mini at http://casitamini1.blogspot.com/. This is one of the blogs with fabulous background music playing. From my very limited spanish classes (we're talking back in high school and college) I think casita means something like "small house." Anyway a great mini blog so definitely check it out.

And next would be Tiny Delights. I didn't see a blog, but the profile put this follower in Portugal. There was a link to a flickr album that had some great mini pics - some of the mini food was enough to make me hungry for real. Check out the link here http://www.flickr.com/photos/watusirv/.

And now for Kabrina Dawn who is from Arizona. Her profile says that we have two things in common - she loves crafts and miniatures and that she has a business degree. Now if there was only a way to combine the two and make money!!! You can check out her blog at http://kabrinasminiatures.blogspot.com/.

Mags Cassidy is the next follower that I checked out and who is from the United Kingdom. This blog shows some really amazing realistic miniature food. http://mags-nificentminiatures.blogspot.com/.

This next blog I have to go back to because for some reason it would not let me follow when I tried it the first time. Cre8 is from Florida and this blog seems to have a little bit of everything. Her profile also says that she has many pets including turtles so that's definitely something that she and I have in common. Check out her blog at http://tinycrafts.blogspot.com/.

And the last one for tonight is Minna who is from Finland and who loves crocheting minis and making mini furniture. Check out this great blog at http://minnasdollhouses.blogspot.com/.

And now I'll leave you with some pics of my mini making progress. First is one of my attempt to use Casey's tutorial about making pleats for a bed. The Bumblebee boxes didn't work out quite how I wanted them to, but I had spare pieces of wood that I painted vanilla creme to match the pieces of fence that I am using for the head and foot boards. The fabric that I used is not exactly pleated evenly as you can tell, but some of the bottom edge can be cut away once it's attached to the bed frame. I also splurged recently and bought myself a Singer handheld sewer from Wal-Mart (at $15 I thought it was a steal for someone who struggles to sew a button). And the little matching pillow is one of my first creations using the sewer. Next is a leftover box that jewelry comes in that I found at my Mom's. I used the box as a form and covered the outside with popsicle sticks. If you can see the bag of sand behind it then you might be able to guess where I'm going with this. And finally here are some more mini making supplies that I found over at my Mom's. She and my Dad are currently cleaning out their basement so there's lots of good stuff to be found. First the string I think could be roughed up and used for some nice mini rope to hang outside of my saloon. Gotta have something to tie those mini horses up with, right? Then the book in the middle is an old day planner of my Dad's from 1990. The cover is some of that fake leather looking stuff. I'd like to experiment around with it and make a more realistic looking cover for the scrapbook that I made for my Mom's birthday present. And also the pages of the planner are all edged in gold leaf or whatever you call it. I could use the scrapbook cutter (that I have yet to return to my Mom) and use the pages to make a mini Bible. My real Bible has a black leather cover with gold edged pages so that's what I thought of when I saw the planner paper. And the big wad of cottony stuff off to the right is just all of the insides that I stole out of the old jewelry boxes. I have plans to use those as mattress stuffing. Oops - had to come back and update this one after it was published! The little plush pink stickers that you see on the bottom of the planner are from my Mom's scrapbooking supplies. The "S" is for Sophie and the "O" is for Olive - I thought we might use them to decorate their beds whenever I'm finished.

Tuesday, July 7, 2009

Bed pleats and bead bottles

I have been inspired again by a tutorial on Casey's Minis and wanted to show you what else I am working on. I'm not promising that I'll be able to do this exactly right because let's face it every mini that Casey makes is amazing, but I'm certainly going to try. Her tutorial on beds and how to make pleats starts April 07, 08 and goes forward for a few posts after that. By the way, if you don't already follow Casey's blog then I really recommend that you do. I've started back at post #1 and I am reading my way forward, making notes and bookmarking for future reference along the way.
Funny how this project started was with a box of Bumble Bee Tuna Salad and Crackers snack at work. Not wanting to throw the box away I stuck it in my purse and carried it home. For some reason I just knew it was the right size for something. And then it hit me - beds. Specifically kid sized beds for Sophie and Olive. Then during my next trip to Michael's I picked up a couple of rolls of scrap fabric. At first I was going to get two different patterns, but then I thought that if Sophie and Olive are anything like my sister and I were when we were little, then they would just end up fighting over who got what bed - so matching beds it is. Then I found these great little wooden fence pieces (Micheal's again) and got two larger ones for the headboards and two smaller pieces for the footboards (is that what they're called?). At home I already had this bead board that you can see underneath the fabric. You use it when making necklaces and bracelets, etc. because it has lines to measure with and also it's made out of thick cardboard sort of stuff so when you're midway through making something you just stick a pin in and it keeps everything secure. I also have a box of pins, hairspray, another huge bag of fabric scraps and ribbon that my Aunt gave me, and some fabric tape for supplies. If hairspray doesn't make any sense then read Casey's blog for further details. As I get experiment with this I'll post more pics as well.
While I had the bead board out I thought I would pull out my box of beads as well. I've seen some really cute mini perfume bottles for sale on ebay that were made out of beads so I thought since I've already got the supplies that I would give it a try. I haven't got the right kind of glue just yet so I used pins to try out some different looks. My friends who were over at the apartment agreed that some of these turned out looking like fancy liquor bottles rather than perfume bottles, but that's an okay bonus since I will be needing bottles to fill the saloon eventually. I really like the 3rd one from the left as a perfume bottle though. I think I will give it to Kitty once she has her own little vanity area above the saloon.

Mini cactus for the saloon

Kitty told me that she would like a bit of greenery around the saloon so I thought a nice cactus would be appropriate for a wild west saloon. I found a great tutorial on Casey's Minis for April 13, 2008. She took potpourri, tiny terra cotta pots, some dirt and rocks and made beautiful little arrangements. So I took some pots that I already had from Michael's and a bag of rose scented potpourri that I had at the house and dug around in there until I found some interesting shaped pieces. I bought 3 different colors of green paint (59 cents each at Michael's) so I could experiment and find a color that I liked. I also got a block of green plant styrofoam to put into the pots. Below you can see the pieces - they don't exactly look like cactus yet.
I wanted to model my tiny cactus after one that we bought for my Mom for her birthday. As you can see in the picture below she already had two very large cactus (in the background) so we bought some little ones to fill up the front of her pot. I like the little one to the left with the yellow flower sticking out of the top. David actually picked this one out because he said it looked like a pickle!
I ended up liking the darkest green color best so I painted it as best I could - I sort of like that some of the natural color of the potpourri comes through because I think it gives it a little more depth. Then I put some styrofoam in the bottom and used the handy little stem on the piece of potpourri and anchored it into the foam. I had bought a bag of coarse decorator sand at Wal-Mart so I applied glue all around the cactus and then sprinkled the sand on top. I will have to get a new kind of styrofoam next time though, b/c the plant kind that I got does not like to have glue applied - it sort of starts to break apart. Then I used a little packet of yellow, pink, and blue flowers that I found on clearance at Michael's. I used a yellow one (not that you can tell in the picture) and cut the wire stem off and glued it to the side. And * voila * we have a super cute mini cactus!