I meant to post this earlier, but better late than never! I've had such fun this month making Christmas crafts. My friends Shannon, Adita, and Jessica all have young children - all at the age where they still enjoy making fun handmade crafts, especially those that involve paint!
The first craft that we did was one that a friend shared with me from Pinterest. We made these adorable Christmas wish list spool ornaments - here is the direct link if you want to view the instructions: http://pinterest.com/pin/184295809720847674/. The spools were bought at Michael's for 99 cents apiece, the ribbon, paint, and accessories were things that I already had, but could be found at any craft store.
Each kid picked a color and painted their own spool. Then we had each one make up their own wish list - we of course wrote the list down for the ones who were too little to write their own. Ribbon was then strung through the spool, the wish list was taped and wound around it, and then scrapbooking scissors were used to cut the bottom of the list. To fancy our spools up a bit we added a strand of shiny ribbon strung with miniature ball ornaments and a candy cane. Then we added each child's name and the year.
The kids who were old enough wrote out their own wish lists. I thought it would be cute for them to see their handwriting years from now.
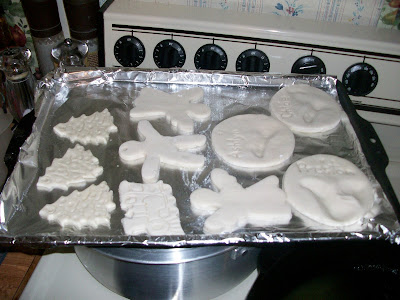
The next Christmas craft that we did was salt dough ornaments. Below is a list of ingredients:
4 cups of flour
1 cup of salt
1 cup of water
The trick to these ornaments is to add the water a little bit at a time while mixing. If you add too much too soon your dough will be gooey and you'll end up using more flour. If the opposite happens and your dough is a bit dry then I found out that you can cheat and spray on a bit of non-stick cooking spray. Once all of the ingredients are mixed you kneed the dough for about 20 minutes.
We used flour and cooking spray to prevent the dough from sticking to the counter and the rolling pin. The next step is simple - just roll the dough out exactly like you would if you were making cookies.
We used Christmas cookie cutters and made lots of fun shapes. The round ornaments you see on the right were made using a round jar lid. Each little one pressed their thumbs into the dough and we used a skewer to write their names as well. We also used the skewer to make a hole in the top of each ornament so that it could be strung later. The ornaments bake anywhere from 20 to 30 minutes depending on thickness in a 325 degree preheated oven. The salt dough will turn white on top and will curl up slightly at the edges. Allow them to cool completely.
And now comes the fun part - the kids love painting! I gave them lots of colors and brushes and just turned them loose :) You can also use glue and glitter if you want. We let them dry for about 24 hours and then I used a spray sealant to coat the ornaments so hopefully they will last longer.
I already have a list of Christmas crafts that I want to try out next year! But until then Merry Christmas everyone!


No comments:
Post a Comment